| | DIY Installation |
You Can Do It Yourself!
If you are prepared for hard work you can install your own putting green. Firstly you need to make sure you have the right tools for the job.
Equipment
- Sod Cutter
- Round tip and flat shovels
- Large landscape rakes for grading
- Plasterers trowel
- 1 hard bristle push brooms
- 200 IBS water roller (sand filled only)
- Wheelbarrow
- Concrete trowel
- Carpet or utility knife
- Seaming iron
- Post hole diggers
- Lawn spreader (sand filled only)
- Laser level or 8�-10� 2x4� with level attached
- Spray paint
- Screening level
|
|
|
Instructions
(a) Lawn Layout and Ground Preparation
Step 1:
Once the lawn is outlined you are ready to remove any existing sod. If your existing ground is not sod covered, skip to Step 4. Utilizing a sod cutter remove the sod from the lawn area plus an additional 1� to 1 1/2�around the perimeter. Set the depth of the sod cutter to between 2 and 3 inches.
Step 2:
You now have the lawn area laid out and have removed any sod from the area plus an additional 1� outside. Rough grade the area using a landscape rake, then using a water hose and nozzle, lightly wet the area and then compact using either a 2 ton double drum roller or 19� plate compactor depending on the size of the Lawn and equipment availability. Make 2 passes over the area to ensure sufficient compaction.
In some cases of poor drainage a hardcore base will be require.
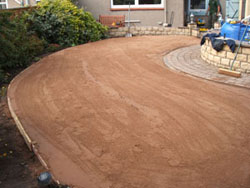
(b) Hardcore Base Installation
Step 1:
Base installation will involve two different types of base material. The first layer of base will be between 2 and 4 inches thick and consist of 1� to fines aggregate material. The second layer should not exceed 3 inches thick and will consist of screenings or other fine material, depending on what is available in your area. The base material is measured by the cubic yard and the following calculation is utilized to determine the quantity of material.
a) Area of green in square feet x depth of layer in feet (inch measurement � 12) = cubic feet of material
b) Cubic feet � 27 = Cubic yards of material
c) Round the final measurement up to calculate for any waste
Whether the material is delivered or you pick it up have it onsite when you are ready to begin the base installation.
Step 2:
Using a shovel and rake, place base material evenly over the lawn area.
Step 3:
When you have finished the first layer of base and are satisfied with the level you should have between 4 and 5 inches of material installed. You are now ready to compact this layer. Using the water hose and nozzle thoroughly wet the entire area, but take care not to saturate it. Then begin compaction with the 2-ton double drum roller or 19� plate compactor. You should make even passes over the area and repeat 2 times to ensure sufficient compaction.
Step 4:
After compacting the first layer recheck your levels and then rough the entire area with a landscape rake.
Step 5:
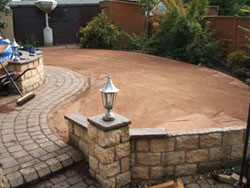
Begin installing the screenings/fine material. Remember to maintain the level you created with the first layer and evenly install the second layer at a uniform thickness. You should only need about 2 inches of material with a maximum of 3 inches.
Step 6:
Using the back of the landscape rake gently smooth the surface of the base and wet thoroughly but not overly saturated. Compact the base with either the 2 ton double drum roller or 19� plate compactor with even passes over the base. Compact the entire area at least three times.
(c) Turf Installation
The turf comes in 4 or 2 metre widths. Any green that is wider than 4 metre's will have to be constructed of two 12 foot pieces of turf seamed together.
Before installing your turf, unroll it and lay it out flat on top of the base to let it relax from being rolled up. To unroll the turf, place the roll or rolls on one side of the green and gently roll turf out over the base. Do not drag the turf across the surface of the base. If possible you should leave it flat overnight at a minimum.
If you do not have 2 pieces of turf to seam together move on to Final Shaping.
(d) Seaming
Step 1:
Now that you have both pieces rolled out onto base, you will need to overlap the two edges that will be seamed together. Make sure the overlap is at least 3 inches. Now you will have part of one piece on top of the other and they will be referred to as top piece and bottom piece for this procedure.
Step 5:
Now that both pieces are ready, lay them next to each other and make sure that the seam is tight with good pressure applied.
Step 6:
Roll out the seaming tape down the entire length of the seam. Apply the ready mixed glue over the tape evenly, avoid any large lumps.
Step 7:
Seam together, utilizing UK putting greens exclusive seaming methods. Specific instructions will be provided at time of purchase.
(e) Final Shaping
Step 1:
Shape the outer edges and cut them into position.
Step 2:
With a cushion cutter carefully cut the turf. Be sure to have replacement blades available for the knife.
These instructions merely represent the basic guidelines adhered to by a UK Putting Greens installation team they in no way constitute a legal binding agreement. If a client uses these instructions to build a green, UK Putting Greens will not be liable for the outcome of the project.
This is too much; can you install it for me?
If you feel this is too much work or you don�t have the time or the correct tools and equipment, why don�t you let UK PUTTING GREENS do all the hard work for you, as we offer a full professional installation service at competitive rates? We will be pleased to provide you with a full quotation on request. Just call the office on 0845 257 9230 and ask for Jeff.
|